A small bathroom doesn’t mean sacrificing the comfort and luxury of a soaking tub. Many homeowners assume that tub-equipped bathrooms need sprawling square footage, but smart design choices can transform even a cramped 5-by-8-foot space into a functional, relaxing retreat. The key is understanding how to choose the right tub size, optimize your layout, and use every inch strategically. This guide walks through seven actionable strategies that help you install a tub in your small bathroom without feeling cramped, and without breaking the budget or requiring major structural work.
Table of Contents
ToggleKey Takeaways
- Small bathroom design with tub is achievable by choosing compact tubs like 48–54-inch soaking tubs, Japanese soaking tubs, or corner tubs that maximize space without sacrificing comfort.
- Corner placement is the gold standard for tub positioning in small bathrooms, anchoring the space visually while opening the rest of the room for other fixtures.
- Vertical storage solutions like open shelving above the toilet, recessed medicine cabinets, and corner shelves prevent clutter and preserve floor space in cramped bathrooms.
- Light neutral paint colors, strategic lighting layers (recessed lights plus vanity bars), and large mirrors dramatically enhance perception of space and brightness.
- Proper waterproofing with sealed membranes, waterproof caulk, and epoxy grout is essential for longevity, especially in small tub surrounds where moisture concentrates.
Choosing the Right Tub Size and Style
The tub is the anchor piece of any bathroom. In tight quarters, selecting the right dimensions and style determines whether the space feels functional or overcrowded.
Standard full-size tubs run 60 inches long, 30 inches wide, and 20 inches deep, consuming roughly 150 square feet of floor space when you factor in the surrounding clearance. For small bathrooms, consider stepping down to a 48-inch or 54-inch soaking tub, which saves 1 to 2 feet of length without sacrificing much comfort.
Compact Tub Options That Fit Tight Spaces
Japanese soaking tubs are deeper, narrower, and significantly shorter, often 47 inches long by 28 inches wide. They require less horizontal footprint and use less water because the depth (usually 24–30 inches) supports a higher fill level with smaller volume. They’re ideal for small bathrooms and deliver a luxurious soak experience.
Corner tubs are triangular or curved to fit snugly into a corner, freeing up wall space elsewhere. They typically measure 60 inches on each wall but use a corner that might otherwise be dead space. Corner installation does require careful plumbing runs, and you’ll need access behind the walls before drywall goes up, something to plan during renovation, not after.
Alcove tubs (the most common style) fit between three walls. Standard alcove dimensions are 60×30 inches, but compact versions drop to 54×30 or even 48×30. They’re straightforward to install, affordable, and work well in modest-sized bathrooms.
Walk-in tubs with a door are compact yet accessible. Most measure 52–56 inches long by 26–32 inches wide. They’re heavier to install and require a licensed plumber because of their specialized drain and fill mechanisms, but they’re excellent for aging in place.
When picking a tub material, fiberglass and acrylic are lightweight, affordable (usually $300–$800), and easy to install. Cast iron and stone resin tubs last longer but weigh 300+ pounds and require robust framing and professional handling. For small bathrooms, acrylic or fiberglass keeps labor and material costs manageable and installation simpler.
Layout Optimization for Maximum Functionality
Before you order a tub, sketch your bathroom footprint. Measure wall-to-wall dimensions, note window and door locations, and identify plumbing and electrical rough-ins. A small bathroom’s layout can feel either efficient or claustrophobic depending on how you arrange fixtures.
Corner Placement and Open Floor Plans
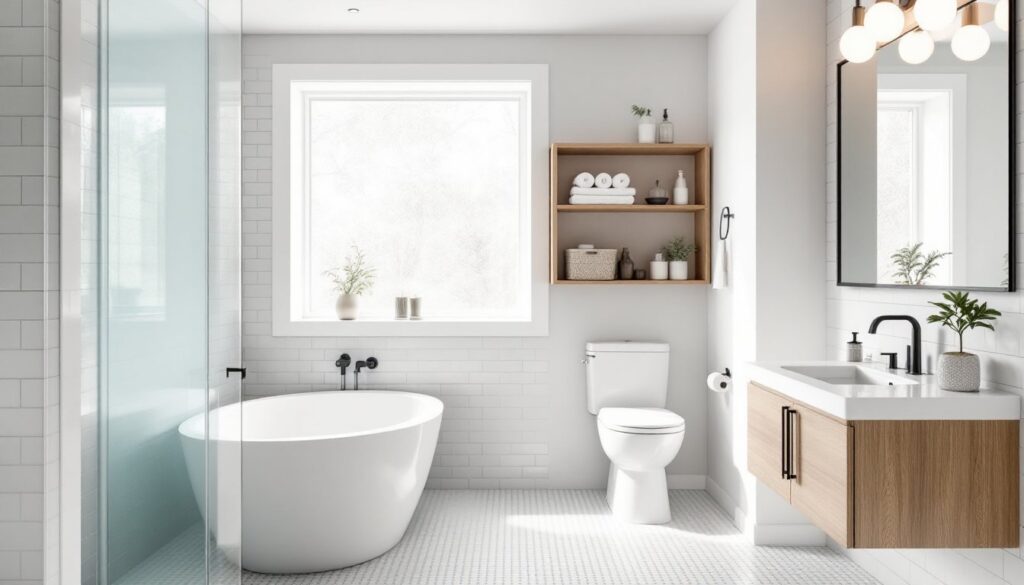
Placing the tub in a corner is the gold standard for small bathrooms. It anchors the space visually, tucks the fixture away from the main sight lines, and opens up the rest of the room for the sink and toilet. A corner tub or an alcove tub rotated to a corner achieves this best.
The toilet-sink-tub triangle should respect the bathroom’s natural flow. If you enter through a door, position the sink near the entry (and mirror overhead for grooming), the toilet in a secondary position (ideally screened by a partial wall or at the room’s far end), and the tub either in a corner or along the longest wall. This arrangement minimizes congestion and supports single-occupant use without collision.
Floating vanities above the floor save visual weight and create the illusion of more space. A 30-inch or 36-inch floating vanity with 2–3 feet of legroom underneath tricks the eye into perceiving a larger footprint. Pair it with a pedestal or wall-mounted sink if you need ultra-compact footprint.
Alcove tub positioning works best along the wall opposite the entry. This keeps the tub from being the first thing you see and reserves wall length for the vanity and storage.
A common mistake is placing the toilet directly beside the tub with no buffer. This creates an awkward, confined sensation. If layout permits, leave at least 12–18 inches of clear floor space (beyond the toilet’s footprint) between the tub and toilet. Building codes typically require 15 inches of centerline clearance from toilet to any wall or fixture: verify local IRC requirements in your jurisdiction.
Storage Solutions That Don’t Sacrifice Space
Storage is where small bathrooms fail most often. A cramped bathroom with bottles, towels, and toiletries scattered everywhere feels even smaller.
Vertical storage is non-negotiable. Install open shelving above the toilet or beside the sink, 2–3 feet of wall space can hold multiple baskets, a towel bar, and decorative bottles without eating floor space. Pre-made shelving units are cheap ($30–$100) and install in an afternoon with just a level, stud finder, and lag bolts into wall studs.
Medicine cabinets mounted above or beside the sink consolidate toiletries and medications. Recessed models sit flush in the wall cavity, saving a few inches of depth. Surface-mounted cabinets are easier to retrofit if your walls are already finished.
Toe-kick drawers under floating vanities maximize dead space and store hairdryers, cleaning supplies, or linens. They’re custom during renovation but affordable compared to full cabinetry.
Corner shelves or Lazy Susans in corners behind the toilet capture wasted corner space. A 24-inch triangular corner shelf costs $15–$40 and holds shampoo, cleaning products, and decorative items without protruding into the room.
Towel bars mounted vertically beside the tub use wall space efficiently. A single wall-mounted bar takes 18–24 inches and holds a weekend’s worth of towels. Heated towel racks double as storage and add subtle warmth (and about 100–200 watts to your electric bill).
Under-sink storage in a pedestal or wall-mounted sink is limited by plumbing, but rolling baskets fit the remaining footprint. A small rolling cart, 16×24 inches, tucks beside the toilet or in a corner and stores bath supplies.
Avoid oversized vanities with deep cabinets. A 24-inch or 30-inch vanity (depth 18–20 inches) supplies adequate storage without monopolizing floor space. Deeper cabinets feel luxurious in large bathrooms but choke small ones.
On the visual side, lighter finishes (white, light gray shelving, natural wood) and open shelves rather than closed cabinets create airiness. Clutter breaks the illusion of space, so commit to minimal, organized storage, not stashed chaos.
Color and Lighting to Enhance Perception
Small bathrooms live or die by lighting and color. Poor lighting makes a tight space feel oppressive: wrong colors amplify cramped feeling. Strategic choices transform perception dramatically.
Paint color is your biggest, cheapest tool. Light neutrals (soft white, pale gray, barely-there blue) reflect light and open the space. Bold or dark colors visually close in walls. Reserve dark paint accents (a single feature wall or lower half) for statement, but keep the majority of walls light. Matte finishes hide imperfections: semi-gloss amplifies light reflection without looking industrial, try a bathroom-grade semi-gloss (latex or enamel) in a soft white or greige for both durability and brightness.
Lighting layers are crucial. A single overhead fixture casts shadows and creates harsh spots. Install recessed lights (6–7 fixtures in a 5×8 bathroom) in a grid pattern for even illumination, then add a vanity bar with 2–3 warm-white LED bulbs (2700K color temperature) above the mirror for grooming tasks. A small sconce beside the mirror, if wall space permits, fills side shadows. Total cost: $150–$400 for LED fixtures that last 10+ years and draw minimal power.
Mirror strategy bounces light. A large mirror above the sink (24×30 inches or wider) opens the sightline. If you install a medicine cabinet, choose a model with a mirrored exterior to multiply reflections.
Natural light from a window or skylight is gold if available. Frosted or privacy glass obscures view while letting light pour in. If no window exists, artificial lighting compensates fully, don’t skip this step thinking one fixture suffices.
Tile color in and around the tub sets tone. White or light tile is clean and spacious-feeling. Small-format tile (3×6 or 4×4 inches) creates visual texture without overwhelming the eye: large-format tiles (12×24) read modern and spacious if your budget allows. Glazed tile reflects light: matte tile absorbs it. For small bathrooms, lighter gloss finishes win.
Grout color matters more than expected. White or light gray grout between white or light tile creates a unified, open feel. Dark grout emphasizes individual tile edges and visually fragments the space, avoid it in tiny bathrooms unless you’re going for a bold, intentional design statement.
Finish Your Small Bathroom Tub Project
Once you’ve planned size, layout, storage, and finishes, the practical execution begins. This is where you separate ambitious DIY from call-the-pro territory.
Tub installation itself depends on the type. An alcove fiberglass or acrylic tub can be installed by a confident DIYer: remove the old tub, rough in new plumbing and drain (if needed), drop in the new tub, level it on mortar or shims, caulk seams with waterproof silicone, and tile or panel the surround. This is 2–4 days of work and costs $200–$500 in materials (tub, drain, valves, caulk, substrate). If plumbing is new, you’ll want a licensed plumber for rough-in and final connections, about $500–$1,000 labor depending on wall access and local rates.
Corner and Japanese tubs require precise plumbing and often custom framing. Unless you’re experienced with construction, hire a licensed plumber and a carpenter to handle the setup, then finish tile and caulk yourself to save labor.
Walk-in tubs are best installed by professionals because of their door seal, drain valve, and fill/drain mechanics. Expect $2,500–$5,000 installed.
Before tiling the surround, ensure walls are clean, dry, and flat (use a straightedge to check). Apply waterproof membrane (RedGard, Kerdi, or similar liquid or sheet-based barrier, $150–$250) to walls 12 inches above the tub rim. This is non-negotiable for longevity. Tile over the membrane with thin-set mortar (not drywall mud), grout with epoxy grout for durability in wet areas (standard grout will eventually fail), and seal grout and tile per the manufacturer instructions.
Caulk the corner seams (where tile meets tub edge) with 100% silicone caulk, not grout. Silicone flexes, allowing for seasonal expansion: grout cracks. Apply caulk in a continuous bead, smooth with a wet finger, and let it cure fully (24 hours) before splashing.
Test the plumbing before finishing walls. Run water, check for leaks at the drain and faucet connection, and confirm proper drainage. Water pooling around the tub or slow drainage signals inadequate slope or a blocked drain, fix it before you tile.
On timelines: a DIY-assisted tub install (you handle demo, finish work: pros do plumbing and framing) typically takes 3–5 days. A fully professional install runs 2–3 days but costs $2,000–$4,000 in labor alone.
Small bathrooms don’t require shortcuts on quality. Research specific materials, bathtub and shower options for various sizes guide selections, and invest in a properly sealed, well-draining tub surround. Browse interior design ideas for bathroom layouts and professional design inspiration for visual reference before finalizing your plan. Your small bathroom will feel spacious, functional, and genuinely luxurious if you respect the fundamentals: right tub size, smart layout, vertical storage, light finishes, and proper waterproofing. That’s not a hack, that’s good building.